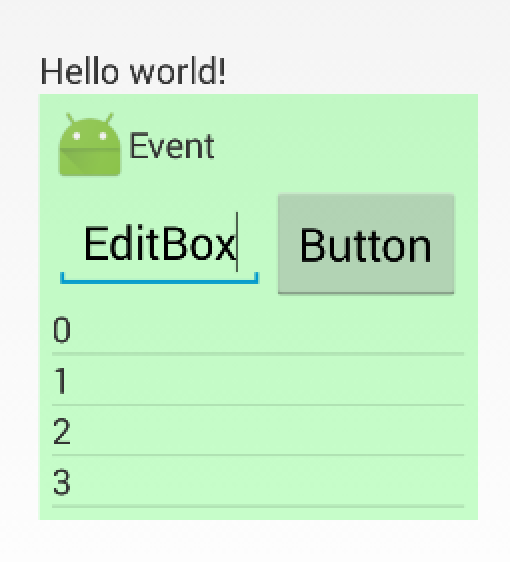
基本用法
首先定义弹窗的Layout文件
res/layout/popup_window.xml
-
<?xml version="1.0" encoding="utf-8"?> -
<LinearLayout xmlns:android="http://schemas.android.com/apk/res/android" -
android:layout_width="wrap_content" -
android:layout_height="wrap_content" -
android:background="#44000000" -
android:gravity="center_vertical" -
android:orientation="horizontal" -
android:padding="5dp"> -
<ImageView -
android:id="@+id/popup_icon" -
android:layout_width="wrap_content" -
android:layout_height="wrap_content" -
android:src="@drawable/ic_launcher" /> -
<TextView -
android:id="@+id/popup_text" -
android:layout_width="wrap_content" -
android:layout_height="wrap_content" -
android:text="@string/app_name" /> -
</LinearLayout>
显示
-
private PopupWindow pop; -
private void showPopupWindowBasic() { -
View rootView = getLayoutInflater().inflate(R.layout.popup_window, null); -
mPopupText = (TextView) rootView.findViewById(R.id.popup_text); -
mPopupText.setText("PopupTextBasic"); -
mPopupWindow = new PopupWindow(rootView, -
ViewGroup.LayoutParams.WRAP_CONTENT, ViewGroup.LayoutParams.WRAP_CONTENT); -
mPopupWindow.showAsDropDown(mTextView); -
}
上述代码中,在PopupWindow实例化时指定了显示的View,宽高均为WRAP_CONTENT,也可以指定固定的尺寸(直接传入int型的px像素值即可)。
**注意:**这里通过Java代码设置的PopupWindow尺寸会直接覆盖Layout文件中顶层控件的尺寸。如果希望能直接在xml中指定弹窗的固定尺寸,且修改尺寸时不需要修改Java代码,从而让代码更加规范,可以考虑对Layout指定尺寸的同时,在其外层再嵌套一个FrameLayout,Java代码中指定PopupWindow宽高均为WRAP_CONTENT,即:
<FrameLayoutandroid:layout_width="wrap_content"android:layout_height="wrap_content"><LinearLayoutandroid:layout_width="100dp"android:layout_height="50dp"><!-- ... --></LinearLayout></FrameLayout>
隐藏
private void dismissPopupWindow() {if (mPopupWindow != null) {mPopupWindow.dismiss();}}
优化
在上述代码中,每次调用show方法都会生成一个新的PopupWindow实例,并且必须通过调用此实例的dismiss方法才能隐藏弹窗。因此,如果连续多次调用show而没有调用dismiss,就会生成多个实例,并且只有最后一个实例能被dismiss。
改进后的show方法如下。对于已经初始化的PopupWindow,当调用了setText等会改变弹窗内容和位置的方法后,需要调用update方法更新。update方法的参数和show方法类似。
-
private void showPopupWindowOptimized() { -
// 如果正在显示则不处理 -
if (mPopupWindow != null && mPopupWindow.isShowing()) { -
return; -
} -
// 如果没有初始化则初始化 -
if (mPopupWindow == null) { -
View rootView = getLayoutInflater().inflate(R.layout.popup_window, null); -
mPopupText = (TextView) rootView.findViewById(R.id.popup_text); -
mPopupWindow = new PopupWindow(rootView, -
ViewGroup.LayoutParams.WRAP_CONTENT, ViewGroup.LayoutParams.WRAP_CONTENT); -
} -
// 设置文本 -
mPopupText.setText("PopupText"); -
// 刷新内容 -
mPopupWindow.update(); -
// 显示 -
mPopupWindow.showAsDropDown(mTextView); -
}
注意事项
在使用PopupWindow时,要注意dismiss方法的调用。当Activity被关闭时,如果PopupWindow仍在显示,此时就会抛出Window Leaked异常,原因是PopupWindow附属于Activity的WindowManager,而Activity被关闭了,窗体也不再存在。所以应该覆写onStop方法如下,确保在Activity退出前先关闭PopupWindow。
@Overrideprotected void onStop() {dismissPopupWindow();super.onStop();}
定义弹窗动画
首先定义弹窗显示、隐藏时的动画
res/anim/popup_window_in.xml
<?xml version="1.0" encoding="utf-8"?><alpha xmlns:android="http://schemas.android.com/apk/res/android"android:duration="300"android:fromAlpha="0"android:toAlpha="1" />
res/anim/popup_window_out.xml
<?xml version="1.0" encoding="utf-8"?><alpha xmlns:android="http://schemas.android.com/apk/res/android"android:duration="300"android:fromAlpha="1"android:toAlpha="0" />
然后在Style中引用动画
res/values/styles.xml
<style name="popup_window"><item name="android:windowEnterAnimation">@anim/popup_window_in</item><item name="android:windowExitAnimation">@anim/popup_window_out</item></style>
最后,在PopupWindow初始化的代码中设置即可
mPopupWindow.setAnimationStyle(R.style.popup_window);
事件响应
默认情况下,PopupWindow弹出后只有在调用dismiss时才会隐藏。弹窗显示的过程中:
- 弹窗区域可以响应点击事件,例如Button可被点击并响应;
- Activity中弹窗以外的区域,也可以进行点击操作;
- 按键事件会被Activity响应,例如按返回键会退出Activity。
点击弹窗以外区域隐藏弹窗
如果想实现点击弹窗以外区域隐藏弹窗,只需在初始化代码中添加以下代码即可。注意,需要给PopupWindow设置一个背景才能生效,这里设置的是透明的ColorDrawable。
mPopupWindow.setOutsideTouchable(true);mPopupWindow.setBackgroundDrawable(new ColorDrawable(0));
设置弹窗可获取焦点
默认的PopupWindow不能获取焦点,根据在模拟器上的实际测试,PopupWindow窗口中:
- 部分机型中,ListView的Item不能响应点击事件
- EditText不能输入文本,因为按键事件会被Activity响应
- Button可响应点击,但由于不能获取焦点,因此点击时不会显示默认点击动画效果
- ……
通过以下代码可以设置PopupWindow可获取焦点。这里同样要给PopupWindow设置一个背景。
mPopupWindow.setFocusable(true);mPopupWindow.setBackgroundDrawable(new ColorDrawable(0));
当设置可获取焦点后,按键操作会被PopupWindow拦截(HOME、电源键除外),因此可以在EditText中输入文本。同时,返回键也会被拦截,按返回键时先隐藏PopupWindow弹窗,再按返回键时Activity才会退出。
显示位置
主要有两种类型的显示方法:showAsDropDown和showAtLocation。
showAsDropDown
public void showAsDropDown(View anchor, int xoff, int yoff, int gravity);
- 弹窗会显示在
anchor控件的正下方。 - 如果指定了
xoff和yoff,则会在原有位置向右偏移xoff,向下偏移yoff。 - 如果指定
gravity为Gravity.RIGHT,则弹窗和控件右对齐;否则左对齐。注意,计算右对齐时使用了PopupWindow的宽度,如果指定的宽度不是固定值,则计算会失效(可以从源码中看出来)。 - 如果弹窗位置超出了Window的范围,会自动处理使其处于Window中。
- 如果
anchor可以滚动,则滚动过程中,PopupWindow可以自动更新位置,跟随anchor控件。
如图是showAsDropDown使用默认值即左对齐的效果。

showAtLocation
public void showAtLocation(View parent, int gravity, int x, int y);
- 弹窗会显示在Activity的Window中。
parent可以为Activity中的任意一个View(最终的效果一样),会通过这个View找到其父Window,也就是Activity的Window。gravity,默认为Gravity.NO_GRAVITY,等效于Gravity.LEFT Gravity.TOP。x,y,边距。这里的x,y表示距离Window边缘的距离,方向由Gravity决定。例如:设置了Gravity.TOP,则y表示与Window上边缘的距离;而如果设置了Gravity.BOTTOM,则y表示与下边缘的距离。- 如果弹窗位置超出了Window的范围,会自动处理使其处于Window中。
显示位置的计算
实际应用中,自带方法的默认值很难满足要求,经常需要自行计算PopupWindow的显示位置。对于固定尺寸的PopupWindow,计算起来并不难,而对于宽高设置为WRAP_CONTENT尺寸不确定的PopupWindow以及一些特殊情况(例如带箭头弹窗箭头位置的控制),计算时会出现一个问题,就是PopupWindow显示之前,获取到的控件宽高都是0,因此没法正确计算位置。
而如果了解控件的尺寸计算流程,解决方案也比较容易,可以在初始化PopupWindow时调用下面的代码触发控件计算尺寸。其中rootView为指定给PopupWindow显示的View。
// 对控件尺寸进行测量rootView.measure(ViewGroup.LayoutParams.WRAP_CONTENT, ViewGroup.LayoutParams.WRAP_CONTENT);
调用完成后,通过调用View.getMeasuredWidth()和View.getMeasuredHeight()即可获取控件的尺寸。
文章末尾的附件项目中实现了一个带箭头的PopupWindow弹窗,为了实现箭头恰好能指向页面底部三个Tab的效果,将箭头作为独立的View放在LinearLayout中,通过计算对其设置合适的gravity和margin。具体见源码。

PopupWindow源码分析
show
阅读PopupWindow的源码可以发现,方法showAsDropDown首先会调用registerForScrollChanged()方法注册监听View anchor的滚动,从而及时更新弹窗的位置,使其能跟随View的滚动。而showAtLocation会调用unregisterForScrollChanged()取消注册监听。
然后会调用WindowManager.LayoutParams createPopupLayout(IBinder token)创建一个WindowManager.LayoutParams对象,这个静态内部类继承自ViewGroup.LayoutParams。在createPopupLayout中通过调用computeFlags,根据设置的Touchable、OutsideTouchable、Focusable等属性计算WindowManager.LayoutParams.flag属性。
WindowManager.LayoutParams的官方文档如下
http://developer.android.com/reference/android/view/WindowManager.LayoutParams.html
计算完成后,会调用preparePopup方法。这里比较重要的一点是,如果给PopupWindow设置了背景,则mBackground != null,此时会在PopupWindow的View对象外嵌套一层PopupViewContainer,而PopupViewContainer继承自FrameLayout并重写了按键和触摸事件拦截方法。因此前面提到点击弹窗外则隐藏弹窗时,需要给PopupWindow设置一个背景。
-
private void preparePopup(WindowManager.LayoutParams p) { -
if (mContentView == null mContext == null mWindowManager == null) { -
throw new IllegalStateException("You must specify a valid content view by " -
+ "calling setContentView() before attempting to show the popup."); -
} -
if (mBackground != null) { -
final ViewGroup.LayoutParams layoutParams = mContentView.getLayoutParams(); -
int height = ViewGroup.LayoutParams.MATCH_PARENT; -
if (layoutParams != null && -
layoutParams.height == ViewGroup.LayoutParams.WRAP_CONTENT) { -
height = ViewGroup.LayoutParams.WRAP_CONTENT; -
} -
// when a background is available, we embed the content view -
// within another view that owns the background drawable -
PopupViewContainer popupViewContainer = new PopupViewContainer(mContext); -
PopupViewContainer.LayoutParams listParams = new PopupViewContainer.LayoutParams( -
ViewGroup.LayoutParams.MATCH_PARENT, height -
); -
popupViewContainer.setBackgroundDrawable(mBackground); -
popupViewContainer.addView(mContentView, listParams); -
mPopupView = popupViewContainer; -
} else { -
mPopupView = mContentView; -
} -
mPopupViewInitialLayoutDirectionInherited = -
(mPopupView.getRawLayoutDirection() == View.LAYOUT_DIRECTION_INHERIT); -
mPopupWidth = p.width; -
mPopupHeight = p.height; -
}
然后会继续计算WindowManager.LayoutParams中的gravity、width、height等参数,最后调用invokePopup方法。
private void invokePopup(WindowManager.LayoutParams p) {if (mContext != null) {p.packageName = mContext.getPackageName();}mPopupView.setFitsSystemWindows(mLayoutInsetDecor);setLayoutDirectionFromAnchor();mWindowManager.addView(mPopupView, p);}
invokePopup中最终调用的是WindowManager.addView(View view, ViewGroup.LayoutParams params)。传入的参数有两个,一个是PopupWindow的mPopupView,另一个是计算好的WindowManager.LayoutParams对象。于是View被添加到WindowManager窗口对象中从而显示出来。
dismiss
调用dismiss隐藏PopupWindow时,最终调用了WindowManager.removeViewImmediate(View view)方法,其本质是从Window中移除View。
update
调用update更新PopupWindow时,会根据传入参数重新计算LayoutParams,计算过程和show方法类似,然后调用WindowManager.updateViewLayout(View view, ViewGroup.LayoutParams params)方法更新View。
WindowManager.LayoutParams
前面提到退出Activity时,要确保PopupWindow隐藏,因为PopupWindow依附于Activity的Window。如果不使用PopupWindow,而直接调用WindowManager添加悬浮窗,通过设置WindowManager.LayoutParams,不仅可以自行实现类似PopupWindow的效果,还可以结合后台Service实现系统级悬浮窗,类似一些优化软件在桌面悬浮窗的效果,而不局限于在一个App或者一个Activity中弹窗。
实现系统弹窗只需设置WindowManager.LayoutParams.type参数即可。
params.type = WindowManager.LayoutParams.TYPE_SYSTEM_ALERT;
同时需要在Manifest中添加权限:
<uses-permission android:name="android.permission.SYSTEM_ALERT_WINDOW" /><uses-permission android:name="android.permission.SYSTEM_OVERLAY_WINDOW" />
文章末尾的附件项目中也有提供一个利用Service显示桌面悬浮窗的简单例子。更详细的介绍可以通过搜索Android 桌面悬浮窗找到。